Wednesday, August 10, 2011

This Peach Cobbler Not the Work of a Shoemaker

I’m afraid the expression is quickly dying out, but there was a time when being called a “shoemaker” was the ultimate kitchen insult. It meant that your cooking skills were so weak, the cobbler down the street could have taken a break from resoling wingtips, come into the kitchen, and done just as well.

That little culinary history lesson has absolutely nothing to do with this beautiful peach cobbler, but I’ve been trying to keep the saying alive, and it gave me an excuse to share. Ironically, this recipe is so easy any shoemaker could master it.

I have to thank everyone who chimed in last week when I asked for cobbler recipes and inspiration. I received so many great variations and techniques, and while I didn’t use any one single recipe, I definitely used parts of several.

I hope you don’t have much trouble finding fresh ripe peaches this time of year, but if you can’t, this will still be very nice using canned. Speaking of finding ingredients, one thing I learned from my research was that for whatever reason, self-rising flour was the way to go.

No one could quite explain it, but cook after southern cook report that the self-rising flour performs much better than plain with salt and baking powder added in (see ingr. below). Do you have a theory? Maybe most people’s baking powder is so old it’s not as strong as the leavening in a freshly purchased bag of SR flour? What I do know is how nicely this turned out.

Anyway, I’m going to kick off my shoes, put up my feet, and savor the last of this delicious cobbler. Enjoy!

UPDATE: Reports from people trying this are that the ones made with self-rising flour came out awesome, and the ones using regular flour didn't work well at all. Fair warning! Get some self-rising flour!


Ingredients:
For the peaches:
5-6 cups sliced peaches (if you use canned peaches, do not make the syrup)
1/8 tsp Chinese 5-spice
1 tsp freshly grated lemon zest
1 cup water
1 cups sugar
For the batter:
1 stick (1/2 cup) butter (real butter! Do NOT use margarine!)
1 cups sugar
1 1/2 cups self-rising flour (or 1 1/2 cup AP flour, plus 2 1/2 tsp baking powder and 3/4 tsp salt - NOTE: this does not work as well...get some self-rising flour!)
1 1/2 cups milk

Tuesday, August 9, 2011

Gluten-Free Chocolate Chip Zucchini Brownies Recipe

Zucchini adds moisture to these fudgy gluten-free brownies.

In the thick of joy and the slow drain of heartache both, I bake. I've mentioned this before. Baking is my way. I tie on my apron and rustle up my inner domestic goddess and cope with the world. Because joy tastes sweeter shared with those you love, gathered around a clatter of plates and clinking glasses and spoons licked clean. And heartache. Well, heartache may not be soothed or tamed by a cookie.

But it doesn't hurt to try.

There are many private joys to celebrate here lately. The love fest surrounding my son's wedding in New Hampshire intoxicated us for days. My husband Steve and I felt no less than transformed by the pure and brilliant love of these two distinct and complicated souls unafraid to risk and hope and dream as one. The bride's family embraced us with such kindness and generosity of spirit, that I left feeling as if I had not only gained a wildly lovely family, but friends for life. Which is exactly what family should be.

A camaraderie of spirit.

With lots of dancing.

Continue reading

BREAKING NEWS: Food Wishes Has Been Acquired by Allrecipes!

It is with tremendous pride and gratitude that I announce Food Wishes has been acquired by Allrecipes.com. Not only is this tremendously good news on a personal level, but it also means joining forces with the world's number one digital food brand.

While I’ve done a decent job of growing the brand, I’m very much looking forward to having our content in front of a new, significantly larger audience, and that’s exactly what this makes possible.

If you’re worried this move is going to result in fewer, or differently formatted videos, relax. If anything, this move allows me the freedom to produce more content than ever before, and this was one of the main reasons I decided to take the deal.

A million thanks for all your amazing support and generosity. This would not, could not, have happened without you. Stay tuned!

Chicken and cheddar ravioli with bacon and tomato sauce

Monday night in our house is cooking night. The kids look forward to this and always tell me a couple of days before what they would like to cook. At the weekend they had decided they would like to make ravioli’s. From there we agreed that chicken and cheddar cheese would be nice as well as a very tasty bacon and tomato sauce.
This is the dish that the children cooked, I was merely a supervisor for the evening and this whole dish was put together by my children.
It really turned out to be a beautifully tasty plate of pasta and I am so proud that my kids really enjoy cooking so much.
Cooking with the kids is an invaluable tool when it comes to getting them to try new foods, eat more vegetables and give them a life skill that will hopefully keep them eating healthy, tasty and nutritious food throughout their lives.

Do try this recipe it is well worth the effort.


Jasmine rolling pasta sheets


Jasmine filling the pasta dough


Jake's turn rolling the dough


Pushing the air and shaping the ravioli's


Cutting the ravioli's


Ravioli's prepared


Cooking the ravioli's


Jake adding the ravioli's to the boiling water

Ingredients;

For the filling;

1 onion finely diced
2 cloves of garlic, crushed
3 chicken breasts, if possible minced by hand as this gives a nicer texture
100g grated cheddar
Salt and pepper to taste
1tblsp Chopped parsley

½ quantity pasta dough, (recipe in this blog under base recipes)
1 egg beaten

For the sauce;

1 onion finely diced
2 cloves of garlic, crushed
4 slices of bacon, diced
150ml white (optional)
1tblsp tomato paste
1 tin of chopped tomatoes
Salt and pepper to taste

Parsley to serve
Shaved parmesan to serve


Method;

For the filling;

Place a pan over medium heat and add a little olive oil. When hot add the onion and garlic, cook over medium heat until soft and translucent. Add the minced chicken breast and cook, stirring all the time until the chicken is just cooked through. At this stage a little white wine can be added as the alcohol will be cook out whilst it cooks. But if you prefer the filling can be made, to the same standard without adding the wine. If adding the wine cook until almost all of the wine has evaporated, remove from the heat and add the grated cheddar cheese, season to taste and add the chopped parsley.
Allow the mixture to cool completely.

Roll the pasta as directed in the pasta recipe on this blog under base recipes.
Lay the sheets onto a work surface and place teaspoons of filling as shown in the picture. Brush around the filling with the beaten egg and fold over. Press down between the filling to remove any air bubbles and cut each of the ravioli’s into squares as shown on the picture. Place the ravioli’s onto a well floured surface and continue with the same process with the other 3 quarters of pasta dough.
Bring a large pan of water to a rolling boil, add a couple of tablespoons of olive oil to the water and cook the ravioli in batches until all are cooked.

For the sauce;

Place a pan over medium heat and add a little olive oil. When hot add the onion and garlic, cook over medium heat until soft and translucent. Add the diced bacon and cook until the bacon starts to crisp slightly. At this stage the white wine can be added as the alcohol will be cook out whilst it cooks. But if you prefer the sauce can be made, to the same standard without adding the wine. If adding the wine cook until almost all of the wine has evaporated, add the tomato paste and cook for a couple of minutes. Add the tinned tomatoes and turn to a low heat, simmer uncovered until the sauce is thickened and a lovely shinny, glossy consistency.
Season to taste.

To serve add the ravioli’s to the sauce and toss everything well, add parsley and mix. Spoon the ravioli’s onto serving plates and top with shaved parmesan.

Serve and enjoy!!! The kids will love it...........


Basic pasta recipe

About pasta as per Wikipedia

Pasta is an unleavened dough of wheat or buckwheat flour and water, and sometimes with eggs. Pasta comes in a variety of different shapes that serve for both decoration and to act as a carrier for the different types of sauce. Pasta also includes varieties, such as ravioli and tortellini that are filled with other ingredients, such as ground meat or cheese. Pasta is eaten as a main meal, starter, soup or dessert.
Pasta is typical of different cultures and countries, but the most famous varieties and recipes come from Italy. There are hundreds of different shapes of pasta with at least locally recognised names. Examples include spaghetti (thin strings), macaroni (tubes or cylinders), fusilli (swirls), and lasagne (sheets). Gnocchi and spätzle are sometimes considered pasta; they are both traditional in parts of Italy.
Pasta is categorised in two basic styles: dried and fresh. Dried pasta made without eggs can be stored for up to two years under ideal conditions, while fresh pasta will keep for a few days under refrigeration. Pasta is generally cooked by boiling.

The History of Pasta
Pasta is believed to have originated in China: the oldest known pasta or noodle-like food were found in China at the Qijia culture Lajia site in Qinghai province. The noodles, dated to 2000 BCE, appear to have been made from foxtail millet and broomcorn millet.
In the 1st century BC writings of Horace, lagana were fine sheets of dough which were fried and were an everyday food. Writing in the 2nd century Athenaeus of Naucratis provides a recipe for lagana which he attributes to the 1st century Chrysippus of Tyana: sheets of dough made of wheat flour and the juice of crushed lettuce, then flavored with spices and deep-fried in oil. An early 5th century cookbook describes a dish called lagana that consisted of layers of dough with meat stuffing, a possible ancestor of modern-day Lasagna. But the method of cooking these sheets of dough does not correspond to our modern definition of either a fresh or dry pasta product.
Historians have noted several lexical milestones relevant to pasta, none which change these basic characteristics. For example, the works of the 2nd century AD Greek physician Galen mention itrion, homogeneous compounds made up of flour and water. The Jerusalem Talmud records that itrium, a kind of boiled dough, was common in Israel from the 3rd to 5th centuries AD, A dictionary compiled by the 9th century Arab physician and lexicographer Isho bar Ali defines itriyya, the Arabic cognate, as string-like shapes made of semolina and dried before cooking. The geographical text of Muhammad al-Idrisi, compiled for the Norman King of Sicily Roger II in 1154 mentions itriyya manufactured and exported from Norman Sicily:
West of Termini there is a delightful settlement called Trabia. Its ever-flowing streams propel a number of mills. Here there are huge buildings in the countryside where they make vast quantities of itriyya which is exported everywhere: to Calabria, to Muslim and Christian countries. Very many shiploads are sent.
Itriyya gives rise to trie in Italian, signifying long strips such as tagliatelle and trenette. One form of itriyya with a long history is laganum (plural lagana), which in Latin refers to a thin sheet of dough, and gives rise to Italian lasagna.
According to historians like Charles Perry, the Arabs adapted noodles for long journeys in the 5th century, the first written record of dry pasta. Durum wheat pasta was introduced by Libyian Arabs during their conquest of Sicily in the late 7th century.
In North Africa, a food similar to pasta, known as couscous, has been eaten for centuries. However, it lacks the distinguishing malleable nature of pasta, couscous being more akin to droplets of dough. At first, dry pasta was a luxury item in Italy because of high labor costs, durum wheat semolina had to be kneaded for a long time. Only after the industrial revolution in Naples, when a mechanical die process allowed for large scale production of dry pasta, did it become affordable and popular among the common people.
There is a legend of Marco Polo importing pasta from China which originated with the Macaroni Journal, published by an association of food industries with the goal of promoting the use of pasta in the United States. Marco Polo describes a food similar to "lagana" in his Travels, but he uses a term with which he was already familiar. Some historians believe that in 1295 Marco Polo brought rice flour pasta, the type used to make Chinese dumplings.
Now known as dumpling style or soft pasta, which manifested into ravioli, gnocchi and other similar preparations.
The first concrete information concerning pasta products in Italy dates from the 13th or 14th century
Recipe

Ingredients;

550g ‘00’ flour
4 whole eggs
6 egg yolks
1tblsp olive oil
Salt to taste

Method;

Place the flour on a board or in a bowl. Make a well in the centre and crack the eggs into it. Beat the eggs with a fork until smooth. Using the tips of your fingers, mix the eggs with the flour, incorporating a little at a time, until everything is combined. Knead the pieces of dough together – with a bit of work and some love and attention they’ll all bind together to give you one big, smooth lump of dough!

You can also make your dough in a food processor if you’ve got one. Just place everything in, blend until the flour looks like breadcrumbs, then tip the mixture on to your work surface and bring the dough together into one lump, using your hands.

Once you’ve made your dough you need to knead and work it with your hands to develop the gluten in the flour, otherwise your pasta will be flabby and soft when you cook it, instead of springy and al dente.

There’s no secret to kneading. You just have to work the dough hard with your hands, squashing it into the table, reshaping it, pulling it, stretching it, squashing it again. It’s quite hard work, and after a few minutes it’s easy to see why the average Italian grandmother has arms like Mike tyson! When your pasta starts to feel smooth and silky instead of rough and floury, then the dough is ready. When ready wrap in cling film and put it in the fridge to rest for at least half an hour before you use it. Make sure the cling film covers it well or it will dry out and go crusty round the edges.

How to roll your pasta

Make sure your pasta machine is clamped firmly to a clean work surface before you start (use the longest available work surface you have). Make sure your work surface is completely free, from kitchen objects, as you will need plenty of working space once you start making the pasta, and starting with a clear space to work in will make things much easier.

Dust your work surface with some ‘00’ flour, cut the pasta into 4 and press the first quarter out flat with your fingertips. Set the pasta machine at its widest setting - and roll the pasta dough through it. Lightly dust the pasta with flour if it sticks at all. Click the machine down a setting and roll the pasta dough through again. Fold the pasta in half, click the pasta machine back up to the widest setting and roll the dough through again. Repeat this process five or six times. It might seem like you're getting nowhere, but in fact you're working the dough, and once you've folded it and fed it through the rollers a few times, you'll feel the difference. It'll be smooth as silk.

Now it's time to roll the dough out properly, working it through all the settings on the machine, from the widest down to around the narrowest. Lightly dust both sides of the pasta with a little flour every time you run it through. When you've got down to the narrowest setting, to give yourself a tidy sheet of pasta, fold the pasta in half lengthways, then in half again, then in half again once more until you've got a square piece of dough. Turn it 90 degrees and feed it through the machine at the widest setting. As you roll it down through the settings for the last time, you should end up with a lovely rectangular silky sheet of dough with straight sides. If your dough is a little cracked at the edges, fold it in half just once, click the machine back two settings and feed it through again. If you're making pasta like tagliatelle, lasagne or stracchi you'll need to roll the pasta down to between the thickness of a beer mat and a playing card; if you're making a stuffed pasta like ravioli or tortellini, you'll need to roll it down slightly thinner or to the point where you can clearly see your hand or lines of newsprint through it.

Once you've rolled your pasta the way you want it, you need to shape or cut it straight away. Pasta dries much quicker than you think, so whatever recipe you're doing, don't leave it more than a minute or two before cutting or shaping it. You can lay over a damp clean tea towel which will stop it from drying.


Tres Leches Cake Recipe

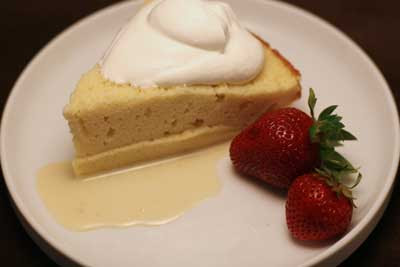
tres leches cake with whipped creamTres Leches (3 milk) cake most likely originated in Mexico although several other Central American and Caribbean nations including Nicaragua, Cuba, Costa Rica, Guatemala, and Panama all lay claim to this sweet and creamy dessert. Tres Leches Cake was invented shortly after the Nestle Company expanded its operations into Latin America during World War Two. Nestle introduced its condensed and evaporated milk products (2 of the main ingredients in this recipe for Tres Leches Cake) into these markets to fill the demand for dairy products that could be used where no refrigeration was available. It was not long after these products were introduced that Tres Leches Cake was invented and became popular throughout Latin America. Try it for dessert after Ropas Viejas or Carnitas.

Ingredients:
1 tspn baking powder
1/2 tspn Kosher salt
1 1/2 cups all-purpose flour
6 eggs
1/4 cup water
1 cup sugar
4 tspn vanilla extract
3 cups heavy whipping cream
1 12oz. can evaporated milk
1 14oz. can sweetened condensed milk
2 tbsp sugar
your choice of fresh fruit for topping (I used fresh strawberries)

Preparation:
  1. Preheat oven to 350 degrees Fahrenheit. Grease a 9 X 3 spring-form pan.
  2. In a large mixing bowl, mix together the baking powder, salt, and flour.
  3. In another mixing bowl, using a mixer beat the eggs and the sugar together at high speed for 5 minutes. Reduce the speed to low and mix in the water and vanilla extract.
  4. Slowly mix in the flour mixture into the egg mixture. Scrape the sides of the mixing bowl of any flour so that all of the ingredients are well combined.
  5. Pour the cake batter into the spring-form pan. Put the pan in the oven and bake for 35 minutes or until done. If you can insert a fork into the cake and it comes out clean, the cake is done.
  6. Remove the cake from the oven and let it cool for at least 15 minutes.
  7. Transfer the cake to a dish that has raised edges - I used a Pyrex pie dish.
  8. After the cake has cooled completely, use a serrated knife to cut off the top crust of the cake so that the cake will be able to easily soak up the milk mixture that we will prepare next.
  9. In a mixing bowl, mix together the condensed milk, evaporated milk, 1 cup of the heavy whipping cream, and 2 teaspoons of the vanilla extract.
  10. Using a fork, poke holes into the top of the cake.
  11. Slowly spoon the milk mixture over the top of the cake allowing the cake to absorb it.
  12. Refrigerate for at least 2 hours.
  13. Serve with fresh whipped cream and your choice of fresh fruit.
Mexican flag Mexico

Monday, August 8, 2011

Molasses-Brined Pork Chops – More Similar to "The Sopranos" Than You Think

I was so happy with how my Carolina barbecue sauce experiment went, I almost forgot I'd filmed the molasses brined pork chop I slathered all that sauce on. So, I figured I better get cracking and post this before grilling season turns into hockey season.

Brining pork chops is like upgrading to premium cable, once you do it, you can’t go back to basic. You hear people say HBO wins all those awards because they have the big advantage of using the profanity and casual nudity that the network competition can't.

When it comes to brining, the F-bombs and low-cut blouses are the flavor and extra moisture that the sweet, salty solution brings. When compared to your standard grilled pork chops, these brined beauties will surely get better reviews.

Other than having to wait a few hours for all that sexy, semipermeable membrane-on-membrane action to take place, this recipe is incredibly easy. Dissolve salt and molasses in water, toss in the chops, and wait. And what do you get from such little effort? A pork chop that's seasoned from the inside out, with a firm, but very moist texture.

I brined mine for about 6 hours, but according many osmotic experts, as little as one hour per pound of pork chop is adequate. For me, that would have been about 45 minutes, but since I learned this trick from a chef that used to leave these overnight, I can’t bring myself to brine them any less.

Whether you cover these with a Carolina barbecue sauce, or some other shiny glaze, I hope you decide to upgrade to premium pork chops soon. Enjoy!


Ingredients:
4 thick double-cut loin pork chops
For the brine:
1/2 cup kosher salt (only use 1/4 cup is using fine table salt)
1/2 cup molasses
4-5 whole cloves
1 cup boiling water to dissolve salt
7 cups cold water